
08 Apr Easy Vegan Kimchi
Kimchi is so popular in Korea the average person eats about 20 kg of it a year – and it’s a condiment! It’s something along the lines of chutney with a bit more substance – a have it with everything or on its own condiment. It’s not just any condiment though – it ranks amongst those foods that are rapidly gaining ground as one of the next best things for your gut health – cultured and fermented goodies made the traditional way.
It makes perfect sense then that it accompanies just about every meal for the Koreans, as it’s a functional food that makes sure you digest your food properly and make the most of your nutrition, whilst pepping up the flavour factor.
Kimchi preserves raw nutrients, contains prebiotics that are already in the vegetables it’s made with, and self-generates probiotics – it’s really efficient all round! It’s a living food like wine and cheese; and as it ages, its taste develops in complexity. It’s made with naturally fermented cabbage (and sometimes other veggies added) and a mixture of garlic, salt, chile peppers, and other spices and has a crunchy, spicy, sour, tangy flavour that adds some zip to your meals. A helping of Kinchi is really nutritious, brimming with fibre and vitamins A, B, and C, and most importantly, the friendly bacteria created from the fermentation process.
It’s been studied for its health benefits and been found to help prevent yeast infections and have possible anti-cancer effects, as well as promoting healthy digestion, reducing bad cholesterol, having anti-aging and brain supporting effects, as well as boosting skin health and your immune system.
We hope your mouth is watering by now and you’re rearing to give this delicious spicy, tangy and crunchy vegan kimchi recipe, compliments of the Minimalist Baker a try yourself.
Traditional Kimchi can apparently be complex to make, but this simpler version should tickle your taste buds just fine. Prepare to be patient, as it needs time to ferment.
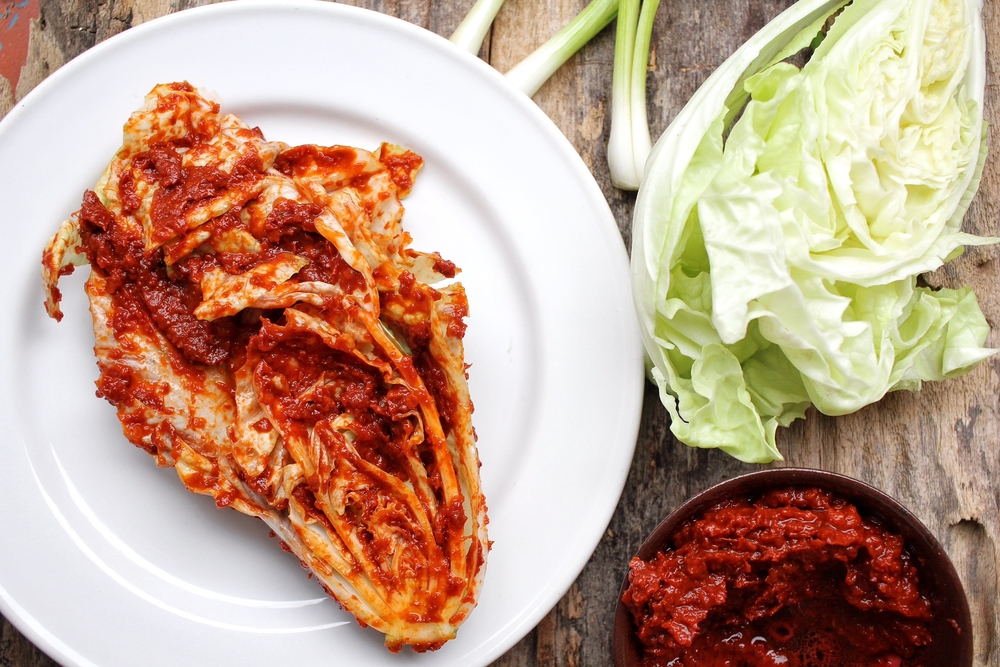
Easy 10 Ingredient Vegan Kimchi
Overall this should take you 40 hours to make, that includes leaving it to ferment (that’s the minimum fermentation time, if you let it ferment longer it will take longer). You’ll need a glass mason jar or two to ferment your kimchi in, or you can use a specially designed fermentation crock pot.
INGREDIENTS
Cabbage
1 head napa or savoy cabbage, outermost leaves removed, well rinsed
Sea salt
Vegan fish sauce
2 Tbsp (30 ml) tamari sauce
2 Tbsp (24 g) coconut sugar (or to taste)
1/4 cup (60 ml) pineapple juice (from a can)
1/4 cup (60 ml) warm water
Chili Sauce
3 Tbsp (18 g) fresh ginger, peeled and chopped
1 head garlic (1/3 cup cloves or 45g)
1 small white onion (or 1/2 large or ~100 g)
1/2 cup (32 g) red chili flakes (more or less to taste, try get Korean ones)
Vegetables
2 whole carrots, finely chopped or grated into matchsticks
optional: 6 green onions, roughly chopped
INSTRUCTIONS
Because you are going to be encouraging bacteria to grow (on purpose!), make sure you are using very clean utensils and are working on a squeaky clean surface so that you get good bacteria of the right sort.
Step 1: Rinse your cabbage
Quarter your well-rinsed and dried cabbage and remove the bottom core (hard white section) with a sharp knife and discard.
Step 2: Prime your cabbage
Place your cabbage in a large mixing bowl and pack a generous amount of sea salt in between each of the leaves. Lift each individual leaf and sprinkle with sea salt. Repeat until all leaves have been salted. Then press down and let rest for 30 minutes. You’ll come back to your cabbage a few times later on.
Step 3: Prepare your vegan “fish sauce”
Add all ingredients for the fish sauce to a small mixing bowl and whisk to combine. Set aside.
Step 4: Prepare your chili sauce
Adding the chili sauce ingredients to a food processor. 1/2 cup chili flakes makes it quite spicy so if you don’t like it too hot start at 3-4 Tbsp and work your way up. Taste and adjust the flavour ‘til it’s right. Leave the chili sauce in the blender.
Step 5: Combine the fish sauce & the chili sauce
Add your vegan fish sauce to the chili mixture in the processor and pulse to combine
Step 5: Flip your cabbage
By this time, your cabbage should be ready to flip. Wash your hands and turn each section of cabbage over so it’s facing the opposite way. Pack down with your hands again to compress. You’ll repeat this process 3 more times, waiting 30 minutes in between (always wash your hands before you touch the cabbage).
Step 6: combine your other veggies & sauce
While your cabbage thinks some more, add your chopped carrots and green onion (optional) to a medium mixing bowl, along with the sauce. Stir to combine, then cover and set aside.
Step 7: prepare your containers
Sterilise your storage containers (they also need to be squeaky clean). Bring a pot of water to a boil and place your containers (you can use 1 large mason jar, and 1 small glass container), in a clean sink and pour the boiling water over top. Let them cool slightly, then dry with a clean towel.
Step 8: flip your cabbage again
You’ll need to flip your cabbage another 3 times now with half hour breaks in between. By the end of it, it should be quite shrunken down.
Step 9: Rinse your Cabbage
Once you have flipped your cabbage 4 times (over 2 hours), rinse your cabbage in very cold water, rinsing each section of cabbage to remove excess salt. Then place on 2-3 absorbent clean towels and pat dry. Separate the cabbage leaves so they’re easier to work with.
Step 10: Coat the cabbage
Rinse and dry the mixing bowl the cabbage was in, then return the dried cabbage to the bowl. Begin coating each cabbage leaf with the sauce. (If you have very sensitive skin you could consider wearing kitchen gloves as the chili could irritate sensitive hands)
Coat the cabbage generously, but make sure you make the sauce go far enough to coat all of the cabbage.
Step 11: Pack the cabbage
Make sure your hands are clean and begin placing the coated cabbage leaves in the container, pressing down to make sure there is as little air as possible between leaves. Continue until all cabbage is packed in, then press down very firmly to remove air. Top with a clean, sterilised lid.
Step 12: Let the Fermentation begin
Set in a cool dark place (such as a cabinet, not the refrigerator) to ferment
How long to ferment is up to you. 36 hours is the suggested minimum but you can go up to a week, and it’s probably best not to go beyond 3 weeks. The longer you ferment the more intense and tangy the fermented flavour. A longer fermentation also softens the cabbage more.
While you are fermenting it, open it up each day and press down with a clean utensil, such as a spoon, to press out air bubbles and ensure the kimchi is immersed in liquid. It’s important to keep it immersed (that’s where a fermentation pot is great as it has weights that make sure the veggies are pressed down into the liquid). Seeing little bubbles in the sauce when you press down is a good sign that your kimchi is fermenting nicely.
You can use the nose test to see when it’s done fermenting – it should smell pleasant and tangy. When you feel it’s ready, you can transfer it to the fridge where it can keep anything from a few weeks to a few months.
Enjoy your delicious homemade kimchi as a crunchy, spicy side to any Asian dish, such as fried rice, spring rolls, or tofu stir fry. Or be adventurous and try it with whatever you’re having.
As they say in Korean, Masissge Deuseyo! (Bon appetit)
Catherine Turner
Posted at 09:37h, 11 AprilI’m so interested.
Kate
Posted at 10:09h, 08 JulyMade it!! Thank you! It’s perfect. Very great to eat with warm rice and sushi 🙂