
19 Mar How to Decorate Eco Easter Eggs with Zero-Waste
HOW TO DECORATE EASTER EGGS USING NATURAL ONION SKIN DYE
Holidays are just around the bend – a much-needed pocket of time for slowing down and unwinding. If your mind is already whizzing with ways in which you can entertain the kids during this Easter break, here’s a DIY eco-eggs project that will have adults and kids alike transfixed by the magical unfolding of natural plant dying.
I’ve experimented with a host of different food dyes, and for me personally, this one embodies everything I look for in craft projects – it’s easy to pull together, it’s effective and it makes use of zero-waste living and upcycling principles. Perhaps the quintessential gift from an undertaking like this is that by the end of it all you feel wholly relaxed, I’m talking slow-in–your-bones kind of relaxation. Plus, you have beautiful homemade holiday decorations to marvel at.
Here’s what you need to know in order to make your own onion skin dyed natural Easter eggs. The German in me has taken to calling them Kind-er Eggs. (*giggles at her own joke).
WHAT YOU WILL NEED
EQUIPMENT
- 1 Largish pot
- Ladle
- Drying rack – or keep the egg cartons
- Glass bowl
- Thumbtack
- Sharp pointed knife
CREATIVE STUFF
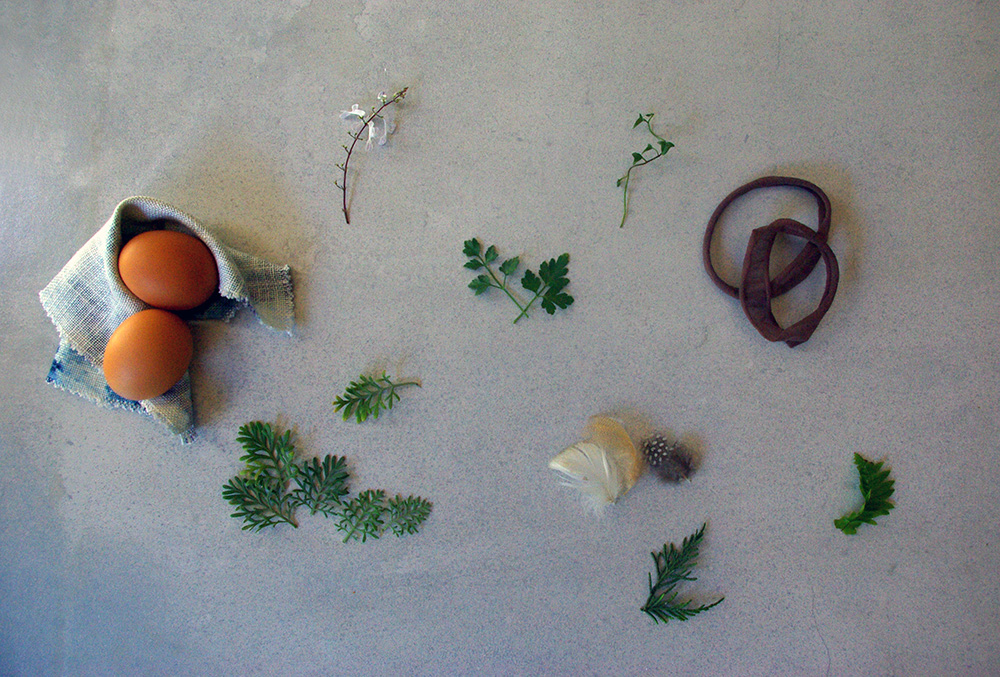
- Twine or wool
- Old nylon stockings (with runners in them)
- Foliage and flowers from the garden (flat leaf parsley works exceptionally well, but get creative with whatever inspires you)
- Feathers
FOOD STUFFS
- Eggs
- White Vinegar (either filtered apple cider or white spirit vinegar)
- Red and brown onion skins (from about 6-8 onions)
- 1 Litre of water
- Olive oil
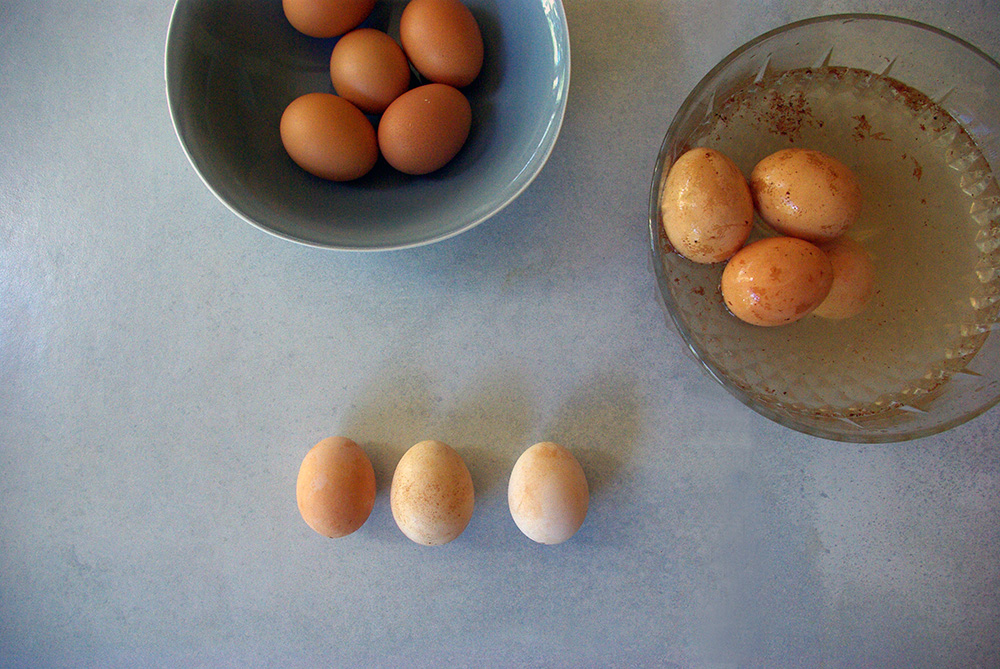
A NB note on the eggs: Brown farm eggs don’t take colour as well as white eggs do. If you can get the white eggs, they take the natural dyes better. If you can only get brown eggs, there’s a way to lighten them, explained below.
HOW TO MAKE ONION SKIN DYED EASTER EGGS
WHITE OR BROWN EGGS?
If your eggs are of the brown farm fresh variety, you’ll need to lighten them:
- Place 2 cups of room temperature water in a glass bowl.
- Add 2 tablespoons of vinegar to the water (the better the quality of vinegar the quicker the bleaching and you also need to use less)
- Place your eggs in the bowl (at this stage it’s best if they’re still whole, raw eggs so they sink).
- Leave them immersed in the water for about 30 minutes.
- You should see a brown film coming off the eggs into the water.
- With a little friction this can be rubbed off further.
- If you want even whiter eggs leave them in for longer.
WHOLE OF HOLLOW EGGS?
Before you can begin dying the eggs, decide if you want to work with blown out egg shells or with whole eggs.
GO WITH WHOLE EGGS IF:
- You’re doing this with kiddies who lack finesse and will crack the shells
- You don’t want to have to turn your floating eggs every now and then while dying them
- You don’t mind eating the hard-boiled, decorated eggs after a few days (you’ll lose your artwork in the process but gain an opportunity to embrace impermanence)
GO WITH BLOWN OUT IF:
- You’re doing this with adults or older kids who can work delicately
- You want to make garlands or hanging decorations
- You want to keep these long-term
IF YOU’VE DECIDED ON HOLLOW:
- Place the thumb tack on a wooden board facing up.
- By pressing the egg down on the thumbtack, prick both ends of the egg.
- Then using the sharp knife delicately pick the holes slightly larger.
- In a container blow out your eggs and set aside.
HOT TIP: I suggest picking out a few recipes beforehand that need eggs so you can blow the needed number of eggs out into allocated containers. I used painter’s friend tape labels on them. Ie. – Rusks – 3 eggs, Chocolate cake – 4 eggs etc.
Otherwise, you’ll just end up with 18 eggs for a family sized fry up (which of course, is also wonderful if you have that many tummy’s to feed).
MAKING ONION SKIN DYE:
- Peel your onions. You want to mainly use that papery outer skin, but the first layer of onion skin that is a little leathery is also good.
- Place the onion skins in a pot with room temperature water and bring to the boil.
- Add in about 4 tablespoons of vinegar once your natural dye mixture is boiling.
- Leave to stand on the stove until your eggs are ready to be dyed..
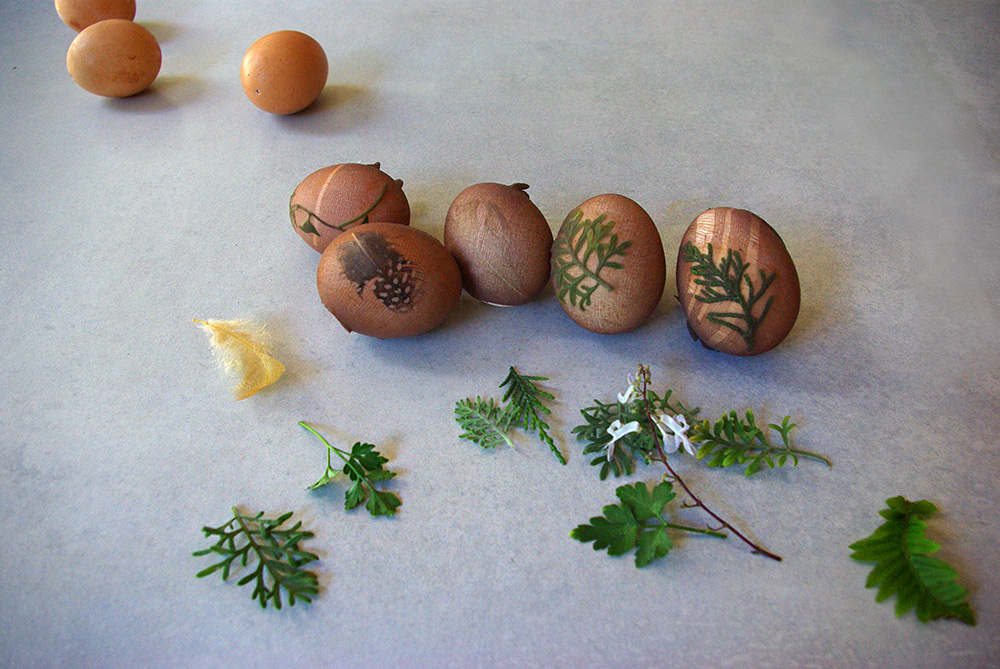
PREPARING YOUR EGGS WITH PATTERNS:
- Cut your nylon stockings into wide strips and then in half so you end up with rectangles. You need one rectangle per egg. Nimble fingers are needed for this next step – adults will definitely need to help eager youngsters here.
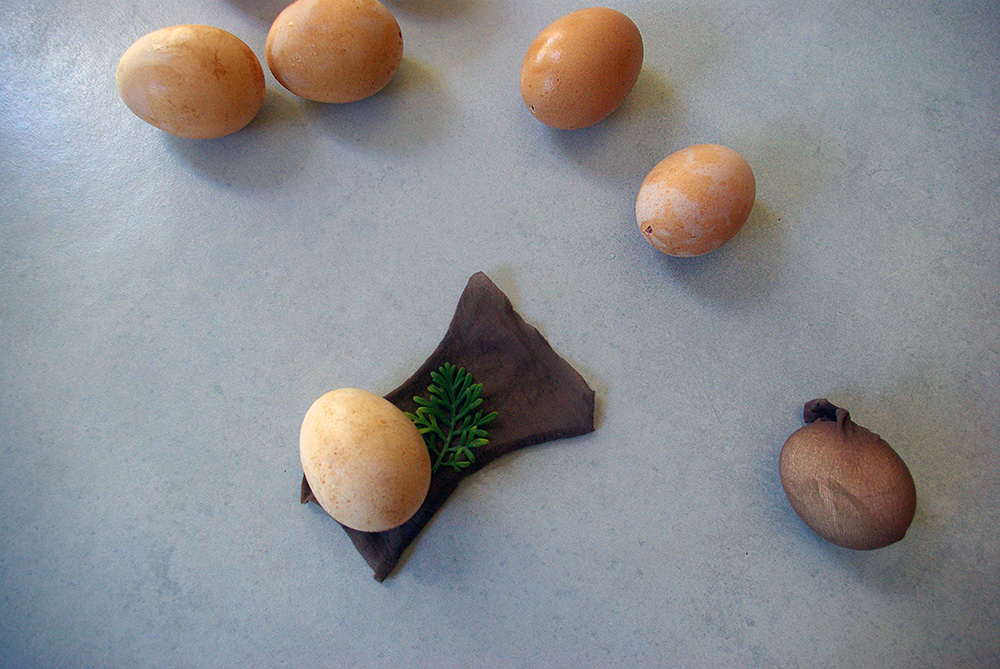
- Placing the foliage in the centre of the rectangle (try and see which way it naturally curves – like the parsley’s front side should ‘hug’ the egg), lay the egg on top of the foliage or feather.
- Fold the opposite corners of the stocking over the egg toward each other and tie the ends together.
- You can also wrap them with wool around the mid-section for a stripy looking end result.
- Once all your eggs are wrapped up – they’re ready to be dyed.
Here are my eggs all lined up and looking about ready to rob a bank.
DYING THE EGGS
- Keep the stove with your pot of onion skin dye on a low rolling boil (the movement helps turn the eggies)
- Place the eggs into the dye mixture. Raw, whole eggs will sink to the bottom and become hard boiled while they are dying. For hollow eggs it helps to scoop the onion skins up and on top of the eggs to keep them partially submerged. But you’ll have to turn these every now and then. Leaving the onion skins in the dye and on top of the eggs helps tp keep them submerged.
- Obviously the longer you keep the eggs in the dye the deeper their colour will become.
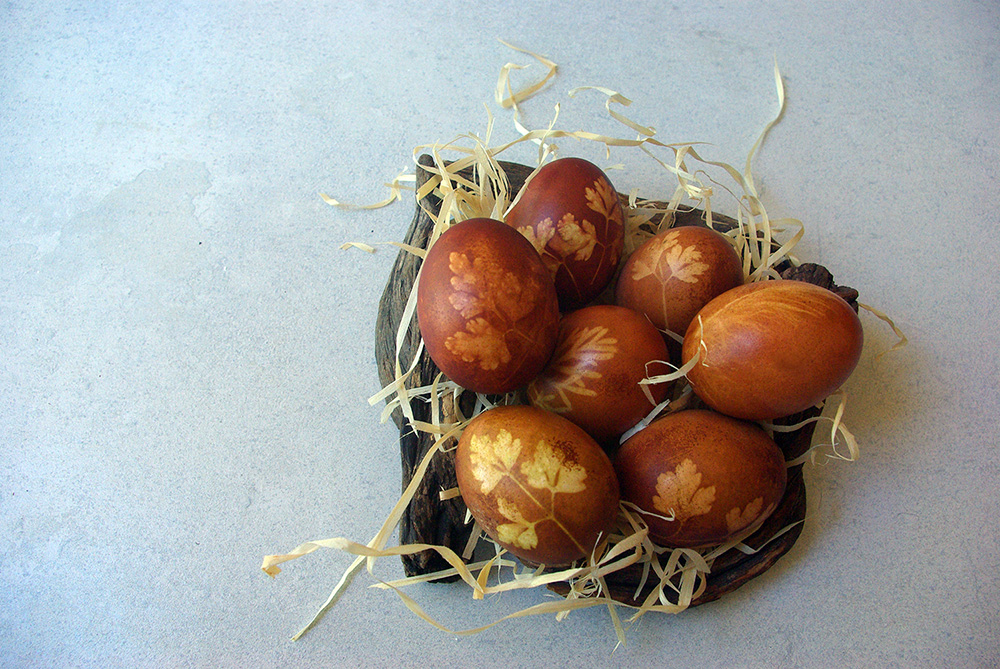
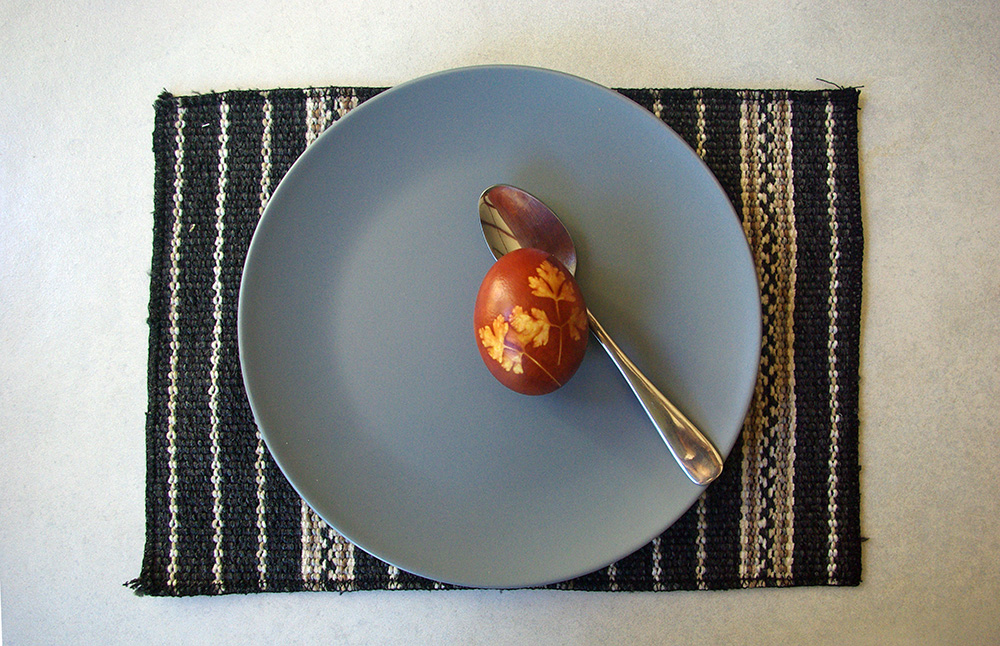
- 15 minutes is a warm rust shade and anything darker becomes deep brick red. I left some of mine in for up to 40 minutes.
- When you think you’re satisfied with the colour, lift them out with a ladle and leave to cool.
- You can then untie the nylon wrappings and reveal your patterns by peeling off the plants or feathers.
FINISHING OFF YOUR ECO EGGS
Once the eggs are cooled and dried, you’ll notice they go a milky white colour. This is due to the long exposure in a vinegar bath. Here’s where the oiling comes in – you need to re-moisturise the shell. Rub the olive oil in delicately with the index finger and set aside. You may need to do this a few times.
And there you have it. Hollow eggs can be strung up with nylon or turned into circular Easter wreaths with wire. The hard-boiled eggs can be admired for 2 or 3 days before they need to be cracked open and turned into egg mayo sarmies.
Once you dip a toe into the world of natural plant and food dying you’ll wonder why you ever did anything with chemical dyes.
Your onion skin dye can be kept in a glass jar for another day’s egg dying adventure. Or you can leave it to cool, drain the water into your plants and compost the onion skins and plant and feathers used for imprinting.
I think children will find sheer joy in the surprise and discovery of this unpredictable process and perhaps even learn some of the subtle pleasures of patience. These onion skin dyed eggs stem from a Russian Easter tradition. To me, their wooden, naturally imprinted look holds an old world charm. And with that, I’d like to wish you a happy, slow Easter.
OTHER SOURCES OF NATURAL DYE:
- Blueberries (fresh or dried) – for a light purple blue colour stain
- Red cabbage (for a deep indigo colour stain: I did try this and had little luck with a rich colour)
- Beetroot (for a magenta colour stain)
- Hibiscus tea leaves (for a deep red colour stain)
- Turmeric (for a yellow colour stain)
- Paprika (for an orange colour stain)
Pingback:Kind-er Eggs for Easter | An eco DIY content project | Andrea Fedder
Posted at 15:20h, 04 April[…] Head to the Faithful to Nature blog to get the DIY How-to steps. […]